| Batmanish Spot Logo |  |
|||
| >> back to www.psycho3d.de << | Mika Saari | |||
| [This is the original text as I have it on my computer, I didn't modify it. If you think I should add the missing parts or modify the text to be up to date please tell me via email] |
| Introduction |
| This tutorial will leave some MeshEdit steps out and if there are questions, how I made these vertices, just send e-mail for me. I try explaining all steps as well I can. There might be easier way to make this BatSpot thing, if so please inform me and I will change this tutorial and learn a little bit myself as well. I won't tell when it is good time to save the file. You can deside it by yourself. Saving is done by F2KEY, give name, press enter so many times that you are back at 3D Modelling window. And one thing more, that Batman logo is not real Batman logo or so did my friend say. I do not remember the shape of real one so this is my version of that logo :) |
| Batman Logo Mesh |
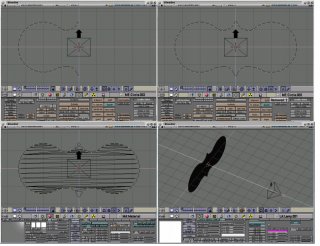
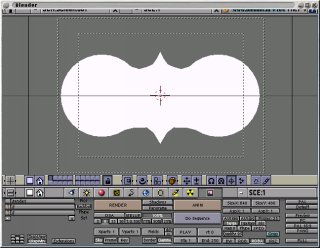
| First when you execute the Blender you will defaultly have that plane on the screen. Erase this plane using XKEY. And because the default camera is looking to other direction than we are press PAD_1 ( 1 from numpad/"Front View"),and you should see scene from behind of the camera. Create circle SPACEKEY>Mesh>Circle and move circle a little bit left so no edges of the circle will touch the middle point to cordinate. (You should be in EditMode all the time) Delete some of the right vertices of the circle by selecting them (shift+right mouse button) and using XKEY to erase vertices. Select other end point of old circle and create some new vertices to "circle" by pressing CTRL while moving the mouse cursor where you want the new vertice to be and pressing left mouse button. Create curve like mesh line to both ends of "circle" using this same method. After you are satisfied to your half of bat image (image 1) select other end from circle and make sure it is just on the y axis. There is two different ways for doing this. 1. Press CTRL-S and select snap to grid. After the vertice is moved on y-axis press GKEY to move the vertice and move it up or down a little bit and same time you move the mouse up or down press middle mouse button. Now the vertice is moving straight up or down. Move the vertice back where it was in y-axis and click left mouse button. 2. Press NKEY. Move mouse cursor on LocX and press Shift+Left mouse button. Remove all old data and press enter twice. Do the same thing to the other end of the "circle". Now both end vertices are on the y-axis and you can duplicate the half of batman logo and mirror it to other half. So do like this. If you have got your "MidPoint" sign moved out from center of your cordinate (that sign which moves when you press left mouse button somewhere in 3D window) then just press SHIFT+C and CKEY and zoom in a little bit if you want. Press AKEY while in EditMode once. If all vertices are magenta press AKEY again. Now all vertices should be yellow, which tells you that all vertices are selected. Now you have to select "Around Cursor" icon from the IconRow, this can be done by mouse or by pressing DOTKEY (. key). Time to copy the half to other half. Take your hand off from mouse Press SHIFT+D (to duplicate the half), SKEY (to scale the half), XKEY (to mirror the half using "MidPoint" as center) and SPACE to accept all your changes. Now you should have bat logo. There is still something to do in EditMode before the actual logo is ready. There are now two separate halfs of logo and it should be only one whole logo. So select all vertices by pressing AKEY as many times that all vertices are yellow. Select the "EditButtons" from "ButtonsWindow" (square next to globe) and press "Rem Doubles" button. Now Blender informs you that 2 vertices are removed (image 2). Still the BatLogo is only a wireframe and there is no faces inside of logo so it is time to make the logo to be plane. This can be done simply by pressing SHIFT+F key. Now you can see pretty many edges inside the BatLogo (image 3). Finaly time to get out of the EditMode press TABKEY. Now you have ready Batman Logo only materials are lacking and the actual image which will be needed for spot light. |
| Batman Logo Material |
| Select the "MaterialButtons" from "ButtonsWindow" (the Red Sphere next to lamp). Push the lonely button which is situated one icon right from "DisplayButtons" in the "ButtonsWindow" (one right from scenery icon that little whith square on a grey background) and select "Material" from the list. The character "0" before "Material" text means that this material is not used in this work before. Set this material as white as you can. This can be done moving all R,G and B sliders as right as you can. Ok Batman Logo is now painted with white material. |
| Batman Logo Lamp |
|
Because you are making texture for spot light it might be best to select hemi as your light for this texture. So press PAD_7 for "Top View" and create new lamp. This can be done by pressing SPACE>Lamp. The lamp should be now in the center of your cordinate and it should be selected as well. Press GKEY to move the lamp and after this press CTRL down (keep it pressed while moving the lamp), move the lamp to the same place as your camera is. Press "LampButtons" from "ButtonsWindow" (the lamp icon next to red sphere) and select "Hemi" button. Now you have to rotate the lamp so it will point exactly to the BatLogo. First you have to select the "Around Center" icon from the "IconRow" so when you are rotating the lamp it won't rotate around the "MidPoint". Press COMMAKEY (, key from keyboard) or select icon from IconRow. Press PAD_1 and six times PAD_4. Press RKEY to rotate the hemi lamp and CTRL down as well and rotate lamp 90 degrees, so lamp point on the |
 |
| Rendering the Batman Logo |
| And finally it is time to render the logo. Because you probably want to use logo as spot texture in future the rendering must be done using RGBA mode. And because Blender likes very much tga files, it is recommended to select TGA as file type. And 320x256 is a little bit too small for your texture set it to 640x480. And how this all can be done ? Select the "DisplayButtons" from "IconRow" (the scenery like button next to radiocity icon in CKEY version and next to brush icon in Free version). Press RGBA button in DisplayButtons. Select Targa button as well. Change 320 to 640 by pressing the button with left mouse button while pressing SHIFTKEY, do the same for 256 but with value 480. Now press F12 and you will see great Batman Logo, or what ever it is ? Save the image you rendered. Press F3KEY give name and press enter as many times you are back at 3D window. Remember the directory and name you entered because you will be using that same texture in near future. |
 |
| Restart the Blender OR create new Scene |
| Creating The World |
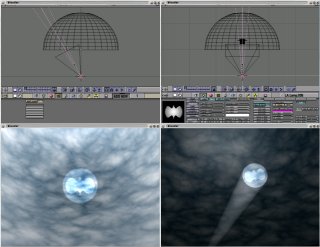
| Because you can not project spot textures on the World sky, do simple half sphere and project Batmanish Logo on that. Create UVSphere by selecting SPACEKEY>Mesh>UVSphere and use default values 32 and 32. Unselect all vertices by pressing AKEY, now all vertices should be magenta. Now select lower half of the Sphere (just like in the image), and leave the middle row unselected. This can be done by pressing BKEY and selecting rectangular area with mouse (image 1). And last remove all selected vertices by pressing XKEY and confirming the erasing option by selecting "Vertices" from the ERASE list. Exit the EditMode by pressing TABKEY and go to the EditButtons window and press "Set Smooth" button (image 2). It is time to make cloud textures on the half sphere. Because the half sphere is already selected (it should be magenta) just go to Material window (that red sphere in the IconRow) and select the "Material" material from material list (left from MA:Material text) (image 2 and 3). Now select texture icon from "IconRow" (that tiger texture image next to red sphere). Select "Clouds" and set NoiseSize to 0.230, NoiseDepth to 6 and push Hard Noise button down (image 4). |
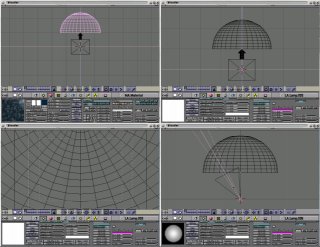 |
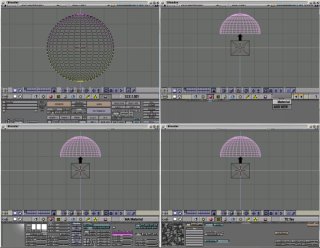
| And back to Material Window by pressing that red sphere in the IconRow. Now there is magenta colored procedural texture on the grey background. Change the material color to R 0.000, G 0.152 and B 0.273 and change texture color to R 1.0, G 1.0 and B 1.0. Now you have white shapes on very dark blue (image 1). Now add new Hemi Lamp. First be sure you are in Top View by pressing PAD_7 key. Now create the lamp by selecting the SPACEKEY>Lamp. Set lamp to be Hemi type lamp. Select Lamp icon from IconRow and push Hemi button and set Energy to 0.740 (either sliding the slider or pressing SHIFT+left mouse key and writing the value). Now back to Front View by pressing PAD_1. Rotate the lamp so the lamp line points upwards towards the half sphere by pressing RKEY and while pressing CTRL moving mouse so that you rotate the lamp 180 degrees (image 2). The camera points to very wrong position so rotate the camera a little bit so it points to the half sphere and there is no black background seen by camera, only the half sphere. Select PAD_0 and you can see through the camera. Press SHIFT+F, this is fly mode for camera, and move mouse upwards so there is seen only sphere inside outter dashed lines (image 3). Now you can check what kind of sky you have by pressing F12 to render the scene. |
| Adding the spots |
| Go back to Front View by pressing PAD_1. Create new lamp by selecting SPACEKEY>Lamp. Select LampWindow from IconRow and set lamp to be Spot type lamp and SpotSi to be 10.0. Now press PAD_4 six times so you can see the spot from side. Rotate lamp 60 degrees so the angle is pretty same as the cameras angle (image 4). |
 |
| Assigning the texture to the spot is really simple. Select the texture icon from IconRow (The tiger skin image next to sphere) and add new texture by selecting the button just right from landscape icon in the icon row and select "Add New" button from the list (image 1). Now select Image from list (next to None button), press Load Image button and browse directory structure so you can find the Batman logoish image you rendered in the first part of your work. One setting more, select the Extend button (image 2). Go back to LampWindow by selecting the lamp icon from IconRow. Press View button which is in the texture part of the LampWindow. Now you can render again and check the result. There should be only the logo. Create another spot by duplicating the current spot. This can be done by pressing SHIFT+D button and SPACEKEY (be sure do not touch mouse while doing this, because it is really simple to move the duplicate to wrong place). Now press Clear button in Texture part of LampWindow, set SpotSi to 12 and select Halo to be enabled (Press halo button). Now you are ready to test the rendering (image 3). If you move the camera you can see the spot light from side and you can get even better Batman logo style feature (image 4). Great spot light playing with Blender |
 |