| Egoshooter |  |
2004 08 06 | ||
| >> back to www.psycho3d.de << | pat | Blender 2.33 | ||
| Introduction |
| Blender 2.0 was the first version of Blender including the GameEngine. Step by step new functions were introduced to make creating games easier for the user. This went on till version 2.25, the last GameBlender to be published by the now bankrupt firm NAN. Since this time Blender's fans have to use the out-of-date Blender 2.25 to put their ideas into action. Till today... Blender 2.33 reintroduced the GameEngine, starting with the 2.25 functionality, but new features can be expected. To use these new possibilities you need a basic understanding of the GameEngine. To use all functions to the max, we'll have to work a little with the programming language Python, but don't mind, you won't have to learn coding now :) We'll start off with a small level where we can walk around, then it's our character's turn and at the end there will be something we can shoot at. So let's start. |
| Level |
 Here you should realize your own ideas. Since I don't want to create opponents, I'll build some kind of shooting range.
First you need the mesh, your level's geometry. I think I can leave this to you. Here's a screenshot of my concept level, just in case you don't have an idea of what it could look like :) Then your level needs textures, there are enough of them in the web, and if you own a digicam you can create your own cool textures. With ALT Z you change to textured view if you didn't do so already, and apply textures as usual. Be sure the face normal points in the right direction. In contrast to normal rendering, the GameEngine only renders one side of the face. You can see which one it is by activating "Draw Normals" (EditButtons, Mesh Tools 1) while the mesh is in EditMode. The blue line shows you which side of the face will be rendered. In textured view you'll see when a face points the wrong way, then you'll have to select the face in EditMode and press W >> Flip Normals. Blender can automatically calculate normals (STRG [SHIFT] N in EditMode, without Shift the normals are turned outside, with Shift inside), but sometimes you'll have to correct the result manually. |
| Player |
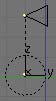
| Before starting here make sure you chose a physics engine in the WorldButtons (F8). The button next to the "Grav" button must not say "None". At present there's only the Sumo engine so change to "Sumo".
In top view create an empty and in front view a camera. Move the camera upwards. Then select the empty, change to the RealtimeButtons F4 and click the "Actor" button and the appearing "Dynamic" button. Now the engine will pay attention to the empty. To test this now you can click the "Add" button in the sensors group (on the left) and change "Always" to "Keyboard". Then click the "Key" field and press a key. Add a controller and draw a line between the yellow dots with your mouse cursor. You'll also have to add an actuator linked to the controller. By the way, you can delete these links by moving your mouse over they so they turn white and pressing X. In the actuator's second "linV" field, this is Y direction, you enter the value 5 and activate the little L button next to it so we'll always move forward, independent of our rotation. If you want to see this you can create a cube at the empty's location, select the cube, then add the empty to your selection and press CTRL P so the cube follows the empty. [now the empty is the cube's parent] Now when you press P in side view, you can move your character with your chosen key and you'll see the cube following. |
 Since this is to be an egoshooter you can delete the cube. Now make the empty the camera's parent (CTRL P), remember to select the empty last. When starting the game you can move through your level in camera view, but always forward is boring! That for here comes the first python script. It will rotate our empty when we move the mouse like we know it from other games.
First our empty needs a mouse sensor reacting to movement. Link it to a python controller and a normal movement actuator. Give the actuator a unique name, e.g. "leftright". [screenshots say linksrechts] |
 |
Also our empty should have a certain property for easier setting: click the "ADD property" button and change the name of the new property to "move". Set this float property to 180. With the mouse over a 3D window press SHIFT F11 to open the text editor, then paste this code: (under windoze with CTRL SHIFT V)
#####
from GameLogic import *
from Rasterizer import *

Cont = getCurrentController()
Own = Cont.getOwner()
Sens = Cont.getSensors()
Sensor = Sens[0]

Height = getWindowHeight()/2
Width = getWindowWidth()/2

#get current mouse position
Xpos = Sensor.getXPosition()

#get actuator
leftright = Cont.getActuator("leftright")

#get mouse position relative to center of window
XDiff = Xpos - Width

#set actuator
leftright.setDRot(0,0,(XDiff/Own.move),1)

#and activate once
addActiveActuator(leftright,1)
addActiveActuator(leftright,0)

#then reset mouse to center of window
setMousePosition(Width,Height)
##### |
|
In camera view you should now see you can rotate left and right. You can set the rotation speed with the empty's "move" property. We also want to pitch the cam up and down so we repeat the whole process for the camera: mouse movement sensor, Python controller, actuator "updown" and "move" property. This is the script for the cam: #####
from GameLogic import *
from Rasterizer import *
Cont = getCurrentController()
Own = Cont.getOwner()
Sens = Cont.getSensors()
Sensor = Sens[0]
Height = getWindowHeight()/2
Width = getWindowWidth()/2
Ypos = Sensor.getYPosition()
updown = Cont.getActuator("updown")
YDiff = Ypos - Height
updown.setDRot((YDiff/Own.move),0,0,1)
addActiveActuator(updown,1)
addActiveActuator(updown,0)
setMousePosition(Width,Height)
#####
Now you can rotate in every direction and take a look at the ceiling while walking forward.
|
| Targets |
|
Change to FaceSelect mode, go to the EditButtons and click the Add button in the "Texture face" group to change the texture mode. If you use a texture with alpha channel you can also choose Alpha so the (black) background will not be visible, only the white foreground is visible. If you use my picture (format PNG) you can activate Alpha, I included the alpha channel. And since you can't distinguish white from white I used a border here :) |
|
We need another small plane with the hole texture (same settings for texture mode but also set Halo) that you create in top view (important!) and rotate in EditMode so the face normal points to negative x direction (top view: to the left). Important: move the hole object to an invisible layer or else the 'add object' actuator we're going to create won't work! Also we need another empty placed behind the crosshair object when in camera view. Make this empty a child of the cam. Create a ray sensor for the empty with long range; 20 or so should be enough but this depends on your level. Next to it you set the axis which points away from camera and crosshair. (that's -Z for me, I created the empty in front view) Then you activate the "Inv" button in the top right and the button in the top left with the three dots. The ray sensor is named "raySen". |
| We need another empty (it's slowly getting full :) with an "Edit Object" actuator named "addHole". In the OB: field you enter the name of your hole object. If you enter a value greater than zero in the time field the holes will disappear after a while. That's our hole-empty. |
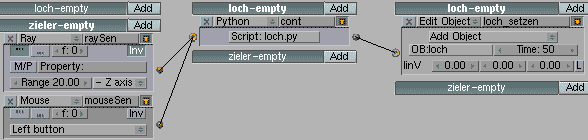 |
Our crosshair-empty now gets a mouse left button sensor "mouseSen". Then add the hole-empty to your selection, create a python controller for the hole-empty linked to the ray sensor, the mouse sensor and the edit object actuator. And here is the script "addHole":
#####
import GameLogic

con = GameLogic.getCurrentController()

mouse = con.getSensor("mouseSen")
if mouse.isPositive():
  own = con.getOwner()

  raySen = con.getSensor("raySen")
  pos = raySen.getHitPosition()

  own.setPosition(pos)

  addHole = con.getActuator("addHole")
  GameLogic.addActiveActuator(addHole, 1)
  GameLogic.addActiveActuator(addHole, 0)
#####
You just need to set the script name in the python controller and then you should be able to see the holes.
And because we still don't have a target you can hang up a target with a red bullseye. |
| www.psycho3d.de - revised 05-05-05 |