| stereorender.py |  |
2005 01 21 | ||
| >> back to www.psycho3d.de << | pat | Blender 2.35 | ||
| Introduction: Fascination 3D |
| Surely you have seen anaglyph pictures, maybe you have also been in a 3D cinema. Now you have the possibility to create your own anaglyph pictures directly with Blender, animations aren't a big problem, either. All you need is Blender, creativity and patience... Unfortunately your scene has to be rendered twice for such a picture and the processing of the pictures to the final anaglyph also takes some time. So if you plan to create a 3D animation you should have a good computer and a lot of time :) While I'm writing this tutorial the script's version is 1.3. |
| It works this way |
| You create your scene and run the script from the scripts menu (group Render). The standard settings will create a greyscale picture but you can change this by clicking either RGB or BW. Also you'll probably have to change the deltaX value. If you want to create an animation you need to set start- and end frame. Additionally you can choose to render the left and right picture and to join them. Using this option may be interesting if you want to render your project in different sessions or plan to edit the source pictures before joining. If you edit them you shouldn't change filenames, especially the additions _right_ and _left_, or the script won't find the pictures. Now the only thing left is to render. The pictures will be saved automatically in the location you chose, you can see where this is in the console window (standard render path if set). You'll also see the total render time with processing inclusive. When the picture is created it will be displayed, you even could save it once more. Warning: the script changes the file format to Targa Raw! (That's because I can handle this format best.) For animations not every frame is displayed but the whole film is played when finished. The settings can be saved in the .blend, before rendering the current settings will also be saved as ** last render **. When loading or saving be sure that you selected the right profile in the menu. To create a new profile select ** Add New ** in the menu, enter the name in the textbox next to it and save. |
| The deltaX value | |
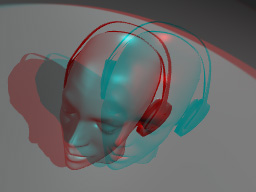
| The distance between the camera positions can be seen as the distance between the virtual eyes. I remember reading somewhere that this distance should be 6 to 8 cm which is the normal distance between human eyes. That would be deltaX = 0.06 for 6 cm. Your settings heavily depend on the size of your scene, the render method makes a difference and also the size of the rendered picture can have some influence on the best value. For small pics the value can be a little greater than for the final version for the lower resolution hides some detail and the big picture has those big red and cyan borders that your brain can't hide completely. |
|
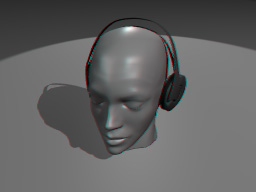 deltaX = 0.02 |
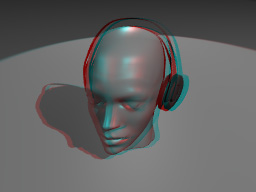 deltaX = 0.10 |
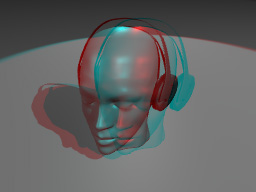
 deltaX = 0.20 |
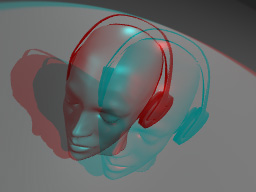
 deltaX = 0.30 |
| The example pictures: In pic 1 deltaX is clearly too small, the 3D effect can be hardly seen. In my opinion pic 2 is nearly perfect, pic 3 is also ok. In pic 4 I think deltaX is too great, the 3D effect is too strong. (I rendered this bigger: you can get a cramp in your eyes when looking at it) Result: try :) |
|
| Correct Cam | |
| This function creates an empty parent to the cam. That's useful if the cam is moved for an animation or if it is rotated (example pics). Depending on the rotation the result can look wrong: the script always moves the cam along the X axis. If the cam was rotated 90° to the side all you could see was a difference in size, not a side movement. The empty defines the cam's coordinate system new so now it's always a side movement. Note that you have to move or rotate the empty now instead of the cam, since the empty is the cam's parent the cam will follow. If you delete the empty the cam will be reset to the origin, the rotation will be reset also. If you don't want that, select the cam and press ALT P and then 2 (Clear and Keep Transformation). Now you can delete the empty, the cam is no longer bound to it. |
|
 without correction |
 with correction empty |
| Animation |
| For animations it's also useful to use an empty as carrier. If you move the cam, the position is calculated for every frame and the script can't change it so no effect would be visible. If you animated the cam with IPOs click the Correct Cam button and the IPOs will be used for the empty instead. Not yet supported: If the cam already has a parent it won't work. You should insert the empty and then parent the other object to the empty. Rendering: once you started rendering you can stop the script with CRTL C in the console window (this works for every script), pressing ESC in the render window won't stop the script. Then you should load your scene for the script changes some settings. So: always save before rendering an animation! |
| Parallel or not? | |
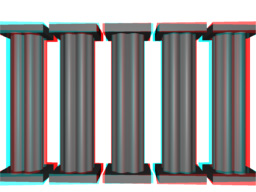
| There is an endless discussion whether the "eyes" should be directed parallel or focused to a point for rendering stereo pictures. I don't want to take part, just this: every method has its (dis)advantages. In the second case the picture looks a bit different, the red/cyan borders behind the focus point are exchanged. The effect may be even better, but there can be problems with objects at the side of your picture, that's why this method is controversial. If you only render in the center you may prefer this method since it creates far less colored borders and the effect is good. |
|
 problem of the focus method |
|
| Above you should be able to see what can happen when deltaX is too great: at the left side the cyan column is bigger, at the right side it's the red one. I think this is called a parallaxis. This problem only exists for the focus method. How to create the focus: I recommend using an empty as focus object, you can move it freely and it doesn't disturb your picture, but you can use every object in your scene. First select the cam, add your focus object to the selection and the press CTRL T and 1 (TrackTo Constraint). The cam now has a constraint named AutoTrack in the object settings (F7). To remove the focus either delete this constraint or the focus object or set Influence to 0. If you want to move the focus object with the cam for animations don't use the cam but the carrier empty as parent for the focus (CTRL P). |
|
 parallel |
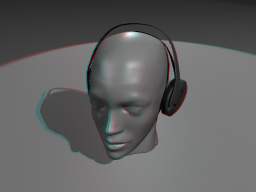 with focus |
| Both pics are rendered with the same settings (deltaX = 0.2), for the right one the cam is always pointed to the head, changing the effect somehow. I think it can be looked at more relaxed. |
|
| And now have fun with your 3D glasses and Blender. |
you probably know that English is not my first language so if there's something that is hardly understandable or completely wrong please tell me! |
| www.psycho3d.de - revised 08-06-08 |